
Imagine cutting into a cloud-like cake that tastes just like spun-sugar carnival magic—this cotton candy cake recipe is your ticket to a whimsical, showstopping dessert! Perfect for birthdays, parties, or just a sweet weekend project, this easy-to-follow guide delivers a fluffy, pastel-perfect cake infused with nostalgic cotton candy flavor.
Why you’ll love it:
- No fancy skills needed—just simple steps for a light, airy crumb.
- Customizable colors (go pink, blue, or rainbow!) to match any theme.
- Kid-approved & party-ready—top with sprinkles, whipped cream, or even real cotton candy for extra drama!
Whether you’re celebrating or just craving a bite of childhood nostalgia, this homemade cotton candy cake is guaranteed to delight. Let’s bake some fun!
Below you’ll find: foolproof steps, decorating ideas, and storage tips!
Recipe Overview
This cotton candy cake recipe is designed for easy baking with big wow-factor results. Here’s what to expect:
⏰ Times:
- Prep Time: 20 minutes
- Cook Time: 30 minutes
- Cooling/Decorating: 1 hour
- Total Time: 1 hour 50 minutes
🍽️ Servings:
- 8-10 slices (Two 6-inch/15cm layers or one 9-inch/23cm cake)
- Want more? Double the recipe for a tiered cake!
📊 Nutrition (Per Serving):
- Calories: ~320 kcal
- Carbs: 45g
- Protein: 3g
- Fat: 15g
(Estimates include frosting. For lower sugar, see substitutions.)
🌟 Difficulty Level: Easy
- Great for beginners (no fancy techniques needed)
- Uses common pantry ingredients (with substitutions below)
🔪 Tools You’ll Need:
- 2x 6-inch round cake pans (or 1x 9-inch pan)
- Electric mixer (handheld works too!)
- Gel food coloring (for vibrant pastel hues)
- Piping bag + star tip (optional, for swirls)
💡 Key Success Tips:
- Flavor Hack: Use cotton candy extract for strongest flavor (or reduce syrup + vanilla as a sub)
- Texture Secret: Fold in whipped egg whites for extra fluffiness
- Color Trick: Layer different tints for a “rainbow inside” surprise!
🌡️ Storage:
- Room Temp: 1 day (covered)
- Fridge: 3 days in an airtight container
- Freezer: Unfrosted layers freeze for 1 month
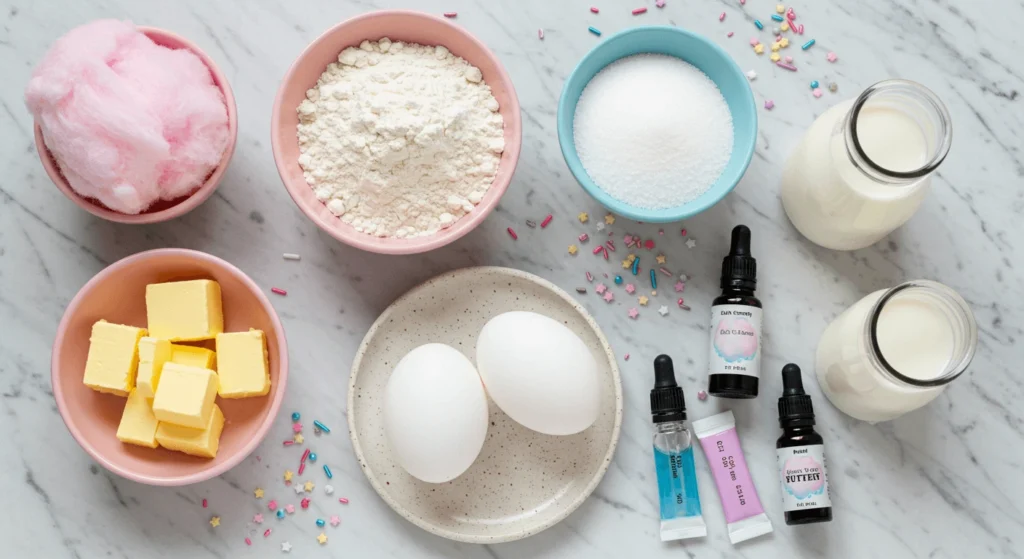
🧁 Ingredients
For the Cotton Candy Cake Layers:
Makes two 6-inch layers or one 9-inch cake
- 1 ½ cups (180g) all-purpose flour
- For gluten-free: Substitute 1:1 gluten-free flour blend
- Pro tip: Spoon flour into measuring cup (don’t scoop!) for accuracy
- 1 cup (200g) granulated sugar
- Reduce to ¾ cup if using cotton candy syrup instead of extract
- ½ cup (113g) unsalted butter, room temperature
- Vegan option: Use plant-based butter sticks
- 2 large eggs, separated
- Egg-free: 2 flax eggs (2 tbsp ground flaxseed + 5 tbsp water)
- ½ cup (120ml) whole milk
- Dairy-free: Almond or oat milk work well
- 1 ½ tsp cotton candy extract(or ¼ cup reduced cotton candy syrup)
- Find this near vanilla extract in baking aisles
- 1 tsp vanilla extract (enhances flavor depth)
- Gel food coloring (pink, blue, purple)
- Why gel? More vibrant colors without thinning batter
For the Cotton Candy Buttercream:
- 1 cup (226g) unsalted butter, softened
- 3 cups (360g) powdered sugar
- 2 tbsp heavy cream (or milk for lighter texture)
- 1 tsp cotton candy extract
- Pinch of salt (balances sweetness)

📝 Step-by-Step Instructions
STEP1 : Prep Work
- Preheat oven to 350°F (175°C)
- Prepare pans:
- Grease two 6-inch round pans (or one 9-inch)
- Line bottoms with parchment paper
- Lightly dust sides with flour
STEP2 : Mix Dry Ingredients
- In a medium bowl, whisk together:
- 1 ½ cups (180g) all-purpose flour
- 1 ½ tsp baking powder
- ¼ tsp salt
- Set aside
STEP3 : Cream Butter & Sugar
- In a large bowl, beat until light and fluffy (~2-3 mins):
- ½ cup (113g) room-temperature butter
- 1 cup (200g) granulated sugar
- Scrape bowl halfway
STEP4 : Add Wet Ingredients
- Mix in one at a time:
- 2 large egg yolks (reserve whites!)
- 1 ½ tsp cotton candy extract
- 1 tsp vanilla extract
STEP5 : Alternate Dry/Wet Mixes
- Add ⅓ of dry ingredients, mix until just combined
- Pour in ½ of milk (¼ cup), mix gently
- Repeat, ending with dry ingredients
- Do not overmix – small lumps are okay
STEP6 : Fold in Whipped Egg Whites
- In a clean bowl, beat until stiff peaks:
- 2 reserved egg whites
- ¼ tsp cream of tartar (stabilizer)
- Gently fold into batter with rubber spatula
STEP7: Color & Pour Batter
- Divide batter into 2-3 bowls
- Tint with toothpick-dipped gel colors
- Layer colors in pans or swirl gently
- Fill pans ¾ full
STEP8: Bake & Cool
- Bake 25-30 mins (6-inch) or 30-35 mins (9-inch)
- Test doneness:
- Toothpick comes out clean
- Cake springs back when lightly pressed
- Cool in pans 10 mins, then transfer to wire rack
- Cool completely before frosting
Frosting & Assembly: Building Your Cotton Candy Masterpiece
1. Make the Cotton Candy Buttercream
- Beat butter (1 cup/226g) until creamy and pale (~3 mins)
- Gradually add powdered sugar (3 cups/360g) on low speed (to avoid clouds!)
- Mix in:
- 2 tbsp heavy cream (or milk for lighter texture)
- 1 tsp cotton candy extract
- Pinch of salt (cuts sweetness)
- Tint frosting with gel colors to match cake layers
2. Prep Cake Layers
- Level cakes if needed: Use a serrated knife to trim domed tops
- Brush layers with simple syrup (optional):
- Mix 2 tbsp water + 1 tbsp sugar, brush lightly for extra moisture
3. Assemble Layers
- Anchor the base: Spread a dab of frosting on cake board to prevent sliding
- First layer: Place on turntable, spread ½ cup frosting with offset spatula
- Second layer: Add upside-down for a flat top
- Crumb coat: Apply thin frosting layer, chill 15 mins (seals in crumbs!)
🔥 Troubleshooting:
- “Frosting too soft?” Chill 10 mins before piping
- “Crumbs in frosting?” Wipe spatula between strokes
4. Frost Smoothly
- Final coat: Apply thick frosting, spin turntable while smoothing sides
- Two-tone effect:
- Divide frosting into 2 bowls, tint each
- Alternate colors in piping bag for swirls
Decorating Your Cotton Candy Cake: Whimsical Ideas & Pro Tips
Turn your baked layers into a showstopping carnival-inspired masterpiece with these easy yet stunning decorating techniques. From simple sprinkles to advanced designs, there’s an option for every skill level!
1. Classic Cotton Candy Cloud Look
Materials Needed:
- Cotton candy buttercream (leftover from assembly)
- Pink/blue/silver sprinkles
- Fresh cotton candy (add JUST before serving)
Steps:
- Use a star piping tip (Wilton 1M) to create fluffy swirls on top
- Gently press sprinkles onto the sides (chill cake first for better adhesion)
- Right before serving, add small tufts of real cotton candy on top (they melt fast!)
2. Rainbow Surprise Inside
For the “Wow!” Factor When Sliced:
- Bake 3 thin colored layers (pink, blue, purple)
- Stack with frosting between each
- Frost the outside plain white—guests won’t expect the rainbow!
3. Drip Cake Elegance
Materials:
- ½ cup white chocolate ganache (3:1 ratio chocolate to cream)
- Pastel food coloring (optional)
Steps:
- Chill frosted cake 20 mins
- Warm ganache to 95°F (35°C)—test drip consistency on a glass first
- Spoon ganache edges, then fill top center
- Immediately add:
- Mini marshmallows
- Edible glitter
- Luster dust-dusted cotton candy
4. Kid-Friendly Unicorn Theme
Quick Add-Ons:
- Gold horn: Mold from fondant or use a candy cone
- Ears: White chocolate cutouts
- Eyelashes: Pipe black frosting or use licorice
5. No-Pipe Shortcut
For Baking Beginners:
- Smooth frosting with a bench scraper
- Top with:
- Store-bought sugar pearls
- Pre-made fondant shapes (stars, hearts)
- Cotton candy “nests” (pile in center)
Decorating Troubleshooting
| Issue | Fix |
|---|---|
| Frosting too soft | Chill cake + bowl 10 mins |
| Drips too thick | Add 1 tsp warm milk to ganache |
| Colors bleed | Use gel (not liquid) dyes |
Storage & Make-Ahead Tips: Keeping Your Cotton Candy Cake Fresh
Ensure your masterpiece stays as magical as the day you made it with these essential storage solutions and time-saving prep tricks.
1. Short-Term Storage (0-24 Hours)
🔹 Frosted Cake:
- Room Temp: Keep covered with a cake dome or inverted bowl for up to 1 day (ideal for parties!)
- Fridge: Store in an airtight container if your kitchen is warm. Bring to room temp 1 hour before serving for best texture.
⚠️ Important Note:
Real cotton candy toppers will dissolve in humidity! Add them just before serving or use cotton candy-flavored decorations instead.
2. Long-Term Storage (Up to 1 Month)
🔹 Unfrosted Layers:
- Freezer: Wrap each layer tightly in:
- Plastic wrap
- Aluminum foil
- Place in a ziplock bag (squeeze out air)
- Thawing: Transfer to fridge overnight, then frost as usual
🔹 Frosted Cake:
- Freezer: Flash-freeze uncovered for 1 hour until frosting is firm, then wrap as above
- Thaw: Unwrap and refrigerate for 4+ hours to prevent condensation
3. Make-Ahead Timeline
🎂 For Stress-Free Parties:
| When | Task |
|---|---|
| 3 Days Before | Bake & freeze layers |
| 1 Day Before | Thaw layers, make frosting |
| Morning Of | Assemble & decorate (add cotton candy last) |
4. Reviving Stale Cake
- Steamer Method: Hold slices over simmering water for 3 seconds to refresh crumb
- Microwave Trick: Dampen a paper towel, cover cake, and heat for 8 seconds
5. What NOT to Do
❌Don’t refrigerate unfrosted cakes uncovered (they’ll dry out)
❌Avoid freezing cakes with fresh fruit fillings (becomes mushy)
❌Never thaw frozen cake at room temp (causes soggy layers)
Cotton Candy Cake FAQ
1. Can I skip cotton candy extract?
Yes! Use ¼ cup cotton candy syrup (reduce sugar by 2 tbsp) or 1 tsp vanilla + ½ tsp almond extract.
2. Why did my colors fade?
Use gel food coloring (not liquid) and avoid overbaking.
3. Egg-free option?
Replace eggs with 2 flax eggs (2 tbsp flaxseed + 5 tbsp water).
4. How to prevent dryness?
Brush layers with simple syrup (1:1 sugar/water) after baking.
5. Can I use different pans?
Yes: cupcakes (18-20 mins), 9×13″ sheet cake (35-40 mins). Adjust times.
6. Frosting too runny?
Chill 15 mins or add ¼ cup powdered sugar.
7. Make-ahead tip?
Freeze unfrosted layers up to 1 month. Thaw in fridge before decorating.
8. Best way to store?
Frosted: 1 day at room temp, 3 days refrigerated.
9. Vegan version?
Use plant-based butter, milk, and flax eggs.
10. Cotton candy topping tip?
Add it just before serving – dissolves quickly!
Need more help? Comment below! 😊
Conclusion: Sweet Memories Start Here!
And just like that, you’ve mastered the whimsical art of cotton candy cake—a dessert that turns every bite into a carnival celebration. Whether you’re surprising a birthday crowd or treating yourself to a nostalgic moment, those fluffy layers and pastel swirls are sure to steal the show.
📸 Share the Magic! Did your cake come out Instagram-perfect? Tag us @GoldenForkRecipes_—we’d love to see your creations!
Love homemade delights? Try our latest kitchen adventure next:
🍣 The Best Tuna Avocado Roll Recipe for Sushi Beginners – Fresh, no-cook, and easier than you think!
Keep baking (and rolling!),
The Golden Fork Team

Cotton Candy Cake
Equipment
- 6-inch/15cm round pans
- Electric mixer
- Gel food coloring
Materials
Cake Layers
- – 1 ½ cups 180g all-purpose flour
- – 1 cup 200g granulated sugar
- – ½ cup 113g unsalted butter, room temp
- – 2 large eggs separated
- – ½ cup 120ml whole milk
- – 1 ½ tsp cotton candy extract
- – 1 tsp vanilla extract
- – Gel food coloring pink/blue/purple
Cotton Candy Buttercream
- – 1 cup 226g unsalted butter, softened
- – 3 cups 360g powdered sugar
- – 2 tbsp heavy cream
- – 1 tsp cotton candy extract
- – Pinch of salt
Instructions
- Preheat oven to 350°F (175°C). Grease two 6-inch pans, line with parchment, and dust with flour.
- Whisk dry ingredients: flour, baking powder, and salt in a bowl. Set aside.
- Cream butter and sugar until fluffy (~3 mins). Beat in egg yolks, extracts, and milk.
- Alternate adding dry ingredients and milk to butter mixture. Do not overmix.
- In a clean bowl, beat egg whites + cream of tartar to stiff peaks. Fold into batter gently.
- Divide batter, tint with gel colors, and layer in pans. Bake 25-30 mins until toothpick comes clean.
- Cool 10 mins in pans, then transfer to wire rack. Frost when completely cool.
Notes
Storage: Freeze unfrosted layers for up to 1 month. Frosted cake keeps 3 days refrigerated.
Substitutions:Use flax eggs for vegan version, or cotton candy syrup + reduce sugar.